|
|
| 
|
Installing Plugins in FL Studio
How to Install VST / AU Plugins (Instruments & Effects)
-
Install the plugin - We strongly
recommend you run the plugin's installer and use its
default install location OR for VST/AU plugins without
an installer, copy the files to the appropriate folder
set in the Plugin Manager > Plugin search
paths field. NOTE: The best manual method is always to
install to one of the default plugin locations for your
OS. Only use the Plugin Manager to add additional plugin
install and search locations if you have a specific and
valid reason.
-
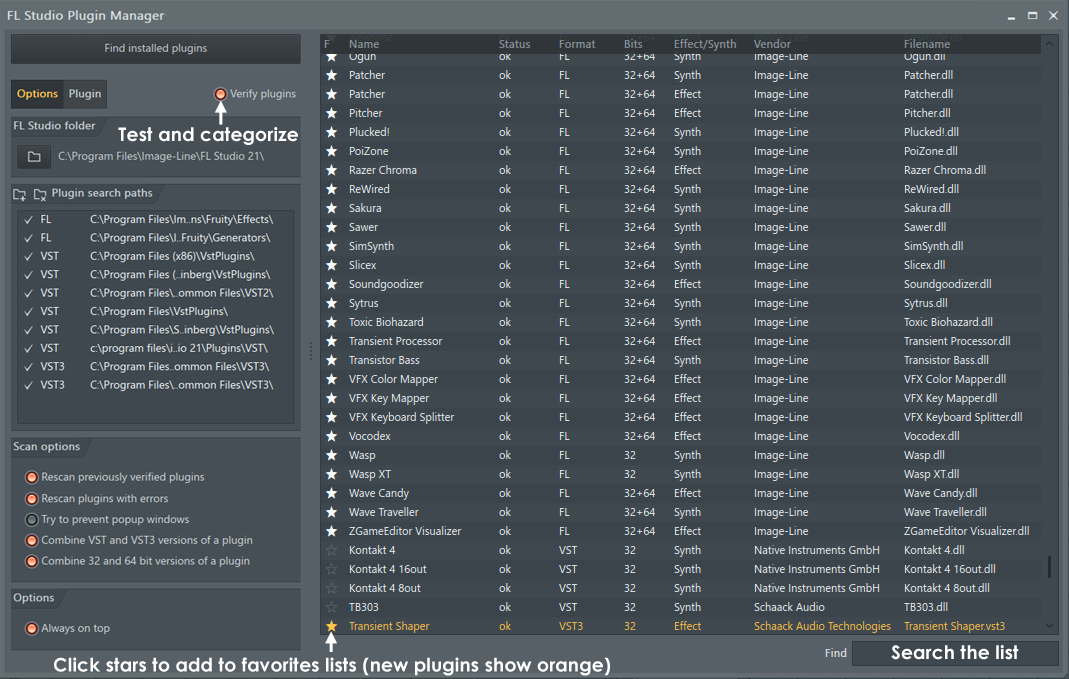
Scan for installed plugins - After
installing the plugin/s, we recommend the 'Find
more plugins + Verify plugins'
option. This correctly sorts plugins into
their Installed > Effects or Generators category. Verify
scans ensure only the correct plugin types are shown at
the various 'add plugin' locations in FL Studio. E.g.
the Channel Rack > Menu > Add one option, Channel Rack +
button and Main menu > Add option, FX slot
menu etc. AND along with the 'Rescan previously verified
plugins' option, ensures plugins are correctly
identified after plugin updates.
IMPORTANT NOTES for macOS Apple
Silicon CPUs and VST Plugins:
When FL Studio is used on an Apple
Silicon CPU it can run in one of two modes. Native Apple
Silicon or Rosetta 2. You can read about FL Studio Apple
Silicon support here. In short, VST plugins developed for Intel CPUs must be
run inside a process-bridge when used under Apple
Silicon. Apple will handle AU format plugins and these
do not need to be bridged. If FL Studio is in Rosetta 2
mode, then Apple handles both VST and AU format plugins.
Below are some notes about how to proceed ...
-
FL Studio Apple Silicon - If you are using FL Studio
in native Apple Silicon mode, Intel VST plugins will
be automatically bridged by FL Studio. AU Intel
plugins will be handled by macOS and appear as if
they were native Apple Silicon.
-
FL Studio Rosetta 2 - If you are running FL Studio
under Rosetta 2 Apple will handle VST and AU Intel
plugins. FL Studio won't bridge any plugins.
-
Mixing Plugin Runtime Formats - Bridging VST plugins
can use more CPU than using FL Studio under Rosetta
2 mode with Intel VST Plugins. Bridged plugins will
almost certainly use more CPU than their Apple
Silicon version (if it is available).
-
Changing FL Studio Runtime Mode - You can set FL
Studio to start in Apple Silicon or Rosetta 2 mode
by following the procedure
here.
-
macOS <> Windows Project Compatibility - If you want
to share projects with Windows installations and you
are using 3rd party plugins, you must use VST
format since this is the only way to maintain
cross-platform project compatibility.
| | |
