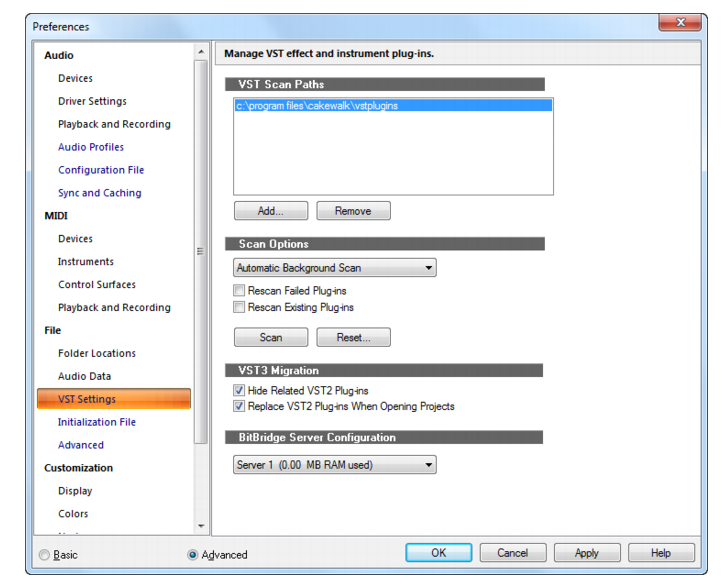
Cakewalk Teleport Server - VST Settings and
Syntheway

Menu

  Home

VST Settings and

BitBridge Server Configuration


The VST Settings section

Click Image to Enlarge


The VST Settings section lets you manage VST effect and instrument plug-ins.

The VST Settings section contains the following settings:

list-image

Add. This button opens the Browse for Folder dialog box, which allows you to select a new folder to be scanned.

list-image

Remove. To remove a folder from the to-be-scanned list, first select the folder, and then click the Remove button.

list-image

Folder defaults. Click this button to open a dialog box of folder options. These settings will set options for all the VST plug-ins in all the folders listed in the VST Scan Folders list. For more information, see To set options for all plug-ins in a folder.

VST Scan Options

list-image

Automatic Background Scan. SONAR automatically scans the folders in the VST Scan Paths list in the background by periodically detecting when data in the folders have been updated, or the scan paths have changed.

list-image

Scan On Startup. The folders listed in the VST Scan Paths list are searched for new plug-ins whenever you start SONAR. Scanning occurs in the background.

list-image

Manual Scan. The folders listed in the VST Scan Paths list are searched for new plug-ins when you click the Scan button.

list-image

Rescan Failed Plug-ins. Checking this option causes any plug-in(s) that didn’t scan correctly to be rescanned during the next scan.

list-image

Rescan existing plug-ins. Checking this option causes plug-in(s) that did scan correctly to be rescanned during the next scan. This is a way to implement any changes you’ve made to the Folder defaults settings.

list-image

Scan. Click this button to immediately scan the folders listed in the VST Scan Paths list.

list-image

Reset. Click this button to remove all scanning records and settings from all your VST plug-ins. Use this button if you want to completely start over.


32-bit VST effects and instruments are loaded into “servers”, and each server can address up to 4GB of RAM. BitBridge supports up to 32 independent plug-in servers, and each server can address up to 4GB of RAM, allowing access to a massive 128GB of RAM. This allows SONAR x64 to address all available RAM in your computer.

By default, SONAR manages memory automatically, and will allocate and allow access to all available RAM dynamically as plug-in's are used. This is done by dynamically creating new BitBridge servers only when necessary, up to a maximum of the available RAM.

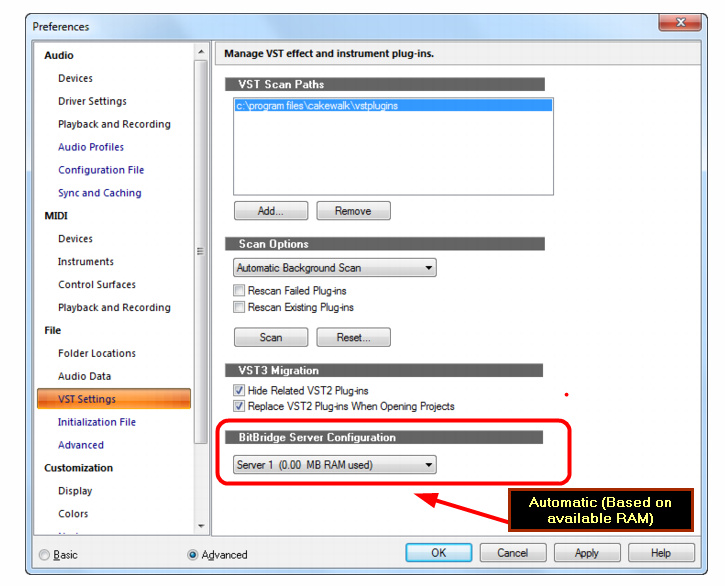
Server loading is either automatic or customizable, giving you full control over which server to load plug-ins into. To enable automatic server loading, select Automatic (Based on available RAM). To manually manage BitBridge servers, select the server that you want plug-ins to be loaded into.

After a specific server is selected, all plug-ins subsequently loaded will be loaded into that specific server, bypassing SONAR's automatic memory management. This also applies when you load a project that contains VST plug-ins.


Tip: To more optimally use your available memory, assign memory hungry VST's to their own private BitBridge server. The actual memory consumed by a server instance is shown in the server list, allowing you choose which server you may want to load into.


Note: Server management is common for all loaded projects. If you have multiple projects open simultaneously, you can potentially overflow the 4GB capacity of a server if the projects reference the same server. Under this condition, a plug-in may fail to load. If this occurs, close the current project before opening another project.


Click Image to Enlarge

Note: "Teleport Server" is the name assigned to the BitBridge app. Error message or crash could appears when you run x64 (64-bit) with x86 (32-bit) VST plug-ins. You could to try by managing "Server Configuration"


Copyright © 2004-2024 Syntheway Virtual Musical Instruments.

Privacy Policy | Disclaimer | FAQ | Site Map | Artists & LinksTechnical Support ContactAbout Us