Syntheway VST, VST3 and Audio Units (AU) are the native plugin formats for macOS. VST, VST3 and Audio Units are more common and
compatible across various DAWs like Logic Pro, GarageBand, Cubase, Ableton
Live, REAPER, Studio One Professional, Ardour, MainStage and Digital
Performer among others.
Syntheway has updated most of its catalog for macOS with Apple
Silicon support
.
These
Audio Units, VST and VST3 plug-ins are now available as
Universal 2 binaries
that work on Intel Macs as well as natively on Apple Silicon Macs.
Progressively, Syntheway will continue to develop native Apple silicon
versions of the
Audio
Effects
and the
Software Synthesizers
plug-ins. These are currently are available for
Mac Intel processors or Apple silicon (M1, M2, M3, M4) in
Rosetta 2
mode.
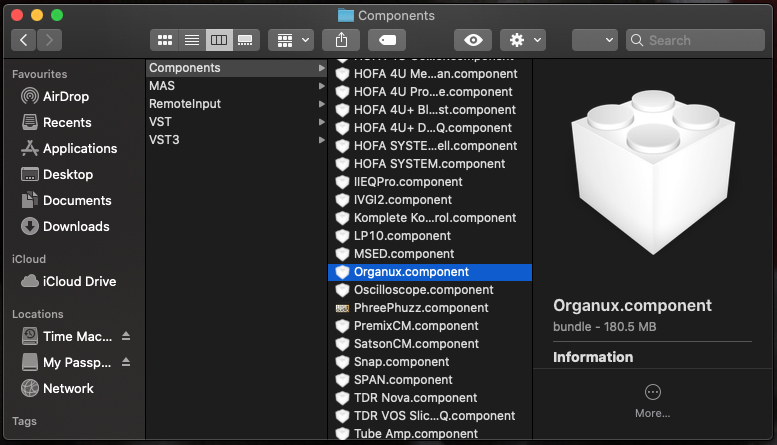
Finding the Audio Plugins
folder
The plugin folder is nested in
the Macintosh HD Library. There are usually a minimum of two Libraries on
your Mac, one in Macintosh HD and another in your user account. You should
only place the plugins in the Macintosh HD Library so that it can be
accessed by all users on the computer. The usual location of the folder
should be:
Macintosh
HD/Library/Audio/Plug-Ins/Components

Macintosh
HD/Library/Audio/Plug-Ins/VST

Macintosh
HD/Library/Audio/Plug-Ins/VST3

How to Install Plug-ins
Audio
Unit (.component) Installation for macOS Instructions:
1.- After download, double-click on the .dmg file (Apple
disk image format, HFS+ volume). This will open the file
with DiskImageMounter utility. Otherwise, right-click the
.dmg file and select Open with > DiskImageMounter from the
menu. A dialog window will appear, verifying the file and
mounting it. Once mounted, the .dmg will appear in the
Finder sidebar under the "Devices" header along with the
hard drive.
2.- Open a Finder window (click the "Finder" icon in the
dock). Highlight the mounted image file within Finder's
sidebar. A list of the files within the .dmg will appear in
the main Finder window pane.
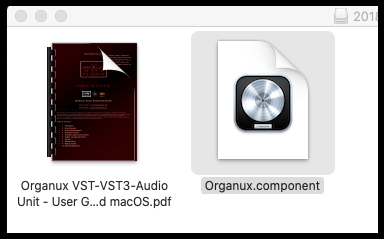
3.- Drag the files you wish to extract to the desired
destination on your computer as for example to your Mac
desktop or directly drag the Audio Unit (.component) to your
‘Library/Audio/Plug-Ins/Components/’ folder.
4.- Unmount the .dmg after you have extracted all desired
files by clicking the small "Eject" icon next to the mounted
image in Finder's sidebar. Additionally, you can right-click
(Ctrl-click) the mounted .dmg icon on the desktop and select
"Eject" or simply unmount the virtual drive by dragging it
to the Trash (Note that this will not delete the files from
your computer, the dmg file will still be there).
5.- If you have the extracted files in your Mac desktop,
move the ".component" file to the Components folder in your
audio plugins folder. Usually
‘Library/Audio/Plug-Ins/Components/’
6.- If your DAW is running, close it and restart it. When
your DAW starts up, it will rescan your plugins folder and
detect your recently installed plugin.
Finding the
Audio Plugins folder: The plugin folder is nested in the
Macintosh HD Library. There are usually a minimum of two
Libraries on your Mac, one in Macintosh HD and another in
your user account. You should only place the plugins in the
Macintosh HD Library so that it can be accessed by all users
on the computer. The usual location of the folder should be:
Macintosh HD/Library/Audio/Plug-Ins/
VST (.vst) and VST3 (.vst3) Installation for macOS
Instructions:
1.- After download, double-click on the .dmg file (Apple
disk image format, HFS Plus volume). This will open the file
with DiskImageMounter utility. Otherwise, right-click the
.dmg file and select Open with > DiskImageMounter from the
menu. A dialog window will appear, verifying the file and
mounting it. Once mounted, the .dmg will appear in the
Finder sidebar under the "Devices" header along with the
hard drive.
2.- Open a Finder window (click the "Finder" icon in the
dock). Highlight the mounted image file within Finder's
sidebar. A list of the files within the .dmg will appear in
the main Finder window pane.
3.- Drag the files you wish to extract to the desired
destination on your computer as for example to your Mac
desktop or directly drag the VST (.vst) to your
‘Library/Audio/Plug-ins/VST/’ folder or drag directly the
VST3 (.vst3) to your ‘Library/Audio/Plug-ins/VST3/’ folder.
4.- Unmount the .dmg after you have extracted all desired
files by clicking the small "Eject" icon next to the mounted
image in Finder's sidebar. Additionally, you can right-click
(Ctrl-click) the mounted .dmg icon on the desktop and select
"Eject" or simply unmount the virtual drive by dragging it
to the Trash (Note that this will not delete the files from
your computer, the dmg file will still be there).
5.- If you have the extracted files in your Mac desktop,
move the files to the VST or VST3 folder. Usually
Library/Audio/Plug-ins/VST and Library/Audio/Plug-ins/VST3
respectively.
6.- If your
Cubase is running, close it and restart it. When your Cubase
starts up, it will rescan your plugins folder and detect
your recently installed VST / VST3 plugins.
VST plug-in locations on macOS
This article provides detailed information on VST plug-in
installation paths on Mac OS X and macOS.
The installation path of a plug-in depends if it is VST2
(.vst) or VST (.vst3) and if it is a default or customized
path:
VST Default paths on macOS
While the newer VST3 format has a dedicated installation
path all VST3 plug-ins must comply with, the VST2 standard
does not know an obligatory folder. However, on Apple
systems there is a defined plug-in folder within the
system's folder structure since the first version of Mac OS
X. All VST plug-in installers for Mac are using these
folders:
|
Format |
Path |
Extension |
|
VST2 |
Library/Audio/Plug-ins/VST
Rarely used: Users/your
username/Library/Audio/Plug-ins/VST |
.vst |
|
VST3 |
Library/Audio/Plug-ins/VST3
Rarely used: Users/your
username/Library/Audio/Plug-ins/VST3 |
.vst3 |
VST Custom paths on macOS
If a
plug-in, for whatever reason, has been installed to a
different folder, the VST host application needs to be told
where to look for it.
|
Cubase 8/Nuendo 7
or later |
Devices > Plug-in Manager >
Plug-in Manager Settings (click on gear symbol) |
|
older Cubase/Nuendo versions |
Devices > Plug-in
Information > VST Plug-ins > VST 2.x Plug-in
Paths |
Cubase / Nuendo macOS Notes:
In Cubase and Nuendo, the list of monitored VST2/VST3
folders can be managed here:
ü
The macOS version of Cubase only stores VST plugins in one
folder: "Library/Audio/Plug-ins/VST or
Library/Audio/Plug-ins/VST3"
ü
Or if you're not logged in with administrative access, these
sub-folders are in the
"Users/[Username]/Library/Audio/Plug-ins" folder.
ü
Place the provided .vst or .vst3 in the VST (Plug-ins)
folder.
ü
Follow instructed under the Cubase operations manual and
restart the program if needed in order to re-scan new .vst /
.vst3 plugins.
ü
Now, the Syntheway VST Plugin (Syntheway Vendor) must be
recognized by Cubase as a native .vst / .vst3 formats
(VST2/VST3 for Mac).
o
Changing Folders in Cubase:
If you decide to move your VST plugins into a different
folder, you'll also need to tell Cubase where the new VST
plugin folder is located. To do this, open the VST "Plug-in
Paths" dialog box and click "Add." Navigate to the location
of the new folder, select it and click "OK." When you're
installing new VST plugins after changing the plugin folder
location, be sure to specify the new location in the
program's installer, as most plugins will automatically
install into the Steinberg directory.
o
Loadable Bundles on macOS
Audio Units, VST and VST3 are loadable bundles, using Cocoa
framework and xCode Integrated Development Environment (IDE)
written in Objective C. Bundles provide a simplified
interface for end users and a convenient way to deliver
software in macOS operating system.


 Cocoa and Cocoa Touch prior to the introduction of Swift.")


")

